Destruction Warlock
![]()
About the author
This guide is lovingly hand-crafted by Furty, a connoisseur of coffee, relapsing academic, sagacious wordsmith, gastropornographer, lover of music, geek, gamer, Michael Fassbender doppelgänger, Lord of Purple Men, and hardcore raider in Midwinter. Furty has been playing all three warlock specs at the highest level since the launch of Mists of Pandaria, though he’s been around since the inception of the game. He may be a true purple man at heart, but his love of the game extends to all classes and roles (except healers, yuck!). You’ll often find him AFK in Stormshield, pondering the recondite existence of humanity. Any questions? JUST ASK!
Spec Overview
Destruction is an extremely flexible, “jack-of-all-trades” specialization with a broad enough toolkit to find purchase on any encounter. Destruction’s main strength is the ability to provide frequent ‘fingertip’ burst via Chaos Bolt, along with strong, consistent cleave. This spec easily allocates add damage without having to bank resources too heavily, and it’s not limited by cooldowns to excel in this role. It can also provide the most potent sustained AoE damage of any class or spec in the entire game. Unfortunately, this spec is heavily reliant on gear and is punished severely by movement.
Though it may not be as dominant as Demonology in Blackrock Foundry, it currently ranks as one of the stronger overall specs this tier.
Links
Changelog
• 5/11: A guide is born
Charred Remains Rotation
This is the basic rotation and priority system. In the Advanced Play section I’ll cover more complex methods to greatly improve your play. You should be using Grimoire of Sacrifice when playing Charred Remains.
1) Keep Immolate applied to the main target at all times. Immolate does moderate damage and criticals generate one emberbit, and you can apply it manually to up to three targets for a single target increase. Immolate only needs to tick a single time for it to be a DPS increase — approximately 2.5s in average haste levels.
2) Cast Conflagrate as often as possible to generate Burning Embers. Conflagrate has two charges, and grants the Backdraft buff. Chaos Bolts consume 3 Backdraft stacks at a time while Incinerates consume only a single stack. Always spend this buff on Incinerate where possible for a large increase in both ember generation and mana sustainability. You should never let Conflagrate sit on 2 charges. Spending Backdraft on Chaos Bolt is more common and less egregious of an error when playing Charred Remains, though you should still aim to avoid it where possible in practice.
3) Cast Incinerate to generate Burning Embers.
4) Cast Dark Soul: Instability on cooldown. You should always save at least 3.5 Burning Embers for this dump. While Dark Soul is active, cast Chaos Bolt, or Shadowburn where applicable, as many times as possible. Ensure a freshly applied Immolate is refreshed before entering this dump so you don’t have to re-apply halfway through.
5) Cast Chaos Bolt and Shadowburn when you have major procs active, such as trinkets. You should always cast an ember consumer regardless of your active procs if you are in danger of capping Burning Embers. Try to avoid casting Chaos Bolt if you have more than two Backdraft stacks, though, there are situations that exist where this cannot be avoided. Consider that Chaos Bolt has an extremely slow flight time, so if you’re casting it on adds that melt quickly you will lose both the damage and the ember if your target dies mid-flight.
6) Apply Havoc on cooldown where possible. Havoc charges can be spent in a variety of different combinations:
- Spells affected by Havoc are: Immolate, Incinerate, Conflagrate, Chaos Bolt, Shadowburn, Mortal Coil, and Spell Lock.
- Chaos Bolt consumes all 3 stacks of Havoc. All other spells consume a single stack.
- Havoc is best spent on Chaos Bolt if both targets are above 20% health.
- Shadowburn is the best use of Havoc stacks if you can cast at least one Shadowburn + at least one other spell before the target dies, with the obvious ideal situation being 3 Shadowburns cleaved via Havoc.
- Havoc can be used for single target purposes. On fights with irrelevant adds, you can put Havoc up then copy Incinerate/Conflagrate/Immolate. This will effectively double your ember generation for 3 casts, greatly increasing the rate at which you can cast ember consumers. A good example of this was the desecrated axes on Garrosh, or the second head on Megaera.
- Havoc is typically unaffected by range or line of sight requirements. For instance, you can apply a Havoc to an add on the Blackhand balcony, jump down and chaos bolt the boss, and it will copy to the balcony add.
- In any situation where you can Havoc on cooldown it is usually best to do so. It’s more important to copy as many spells as possible, rather than observing the normal rules with consumers and waiting for procs.
7) Use Fire and Brimstone in situations where you need to deal AoE damage. The same priority system applies to Fire and Brimstone spells as single target. It takes approximately 5 targets to sustain Fire and Brimstone, decreasing as you gain critical strike rating.
8) Use Rain of Fire on 8+ targets. Rain of Fire deals 50% increased damage to targets afflicted with Immolate, so ensure that it is applied before you lay down Rain of Fire. If two Rain of Fires overlap, the target(s) in both will only take damage from the most recently applied Rain of Fire.
Priority System
This is a list of abilities that are ordered based on the priority they have in the rotation.
1) Havoc where applicable
2) Dark Soul: Instability on cooldown
3) Chaos Bolt and Shadowburn during procs
4) Chaos Bolt or Shadowburn when in danger of capping Burning Embers (~2.8+ embers as CR)
5) Immolate
6) Conflagrate
7) Incinerate
Opener
1) Draenic Intellect Potion
2) Pre-cast Incinerate 4 seconds prior to boss engagement
3) Pre-cast Immolate
4) Summon Doomguard
5) Dark Soul: Instability + On-use Trinkets + Racials
6) Conflagrate
7) Conflagrate
8) Incinerate
9) Chaos Bolt
10) Chaos Bolt
11) Immolate in pandemic range
12) Conflagrate as charge becomes available
13) Incinerate for embers
14) Chaos Bolt 3-5 times as embers allow with Dark Soul/Trinkets
Cataclysm Rotation
This is the basic rotation and priority system. In the Advanced Play section I’ll cover more complex methods to greatly improve your play. You should be using Grimoire of Sacrifice when playing as Cataclysm. Cataclysm is best played on encounters that enable you to use it on multiple targets (3-4) on cooldown, the best example of which are “Council Style” fights.
1) Cast Cataclysm to apply Immolate.
2) Keep Immolate applied to the main target at all times. Immolate does moderate damage and criticals generate one emberbit, and you can apply it manually to up to three targets for a single target increase. Immolate only needs to tick a single time for it to be a DPS increase — approximately 2.5s in average haste levels.
3) Cast Conflagrate as often as possible to generate Burning Embers. Conflagrate has two charges, and grants the Backdraft buff. Chaos Bolts consume 3 Backdraft stacks at a time while Incinerates consume only a single stack. Always spend this buff on Incinerate where possible for a large increase in both ember generation and mana sustainability. You should never let Conflagrate sit on 2 charges.
4) Cast Incinerate to generate Burning Embers.
5) Cast Dark Soul: Instability on cooldown. You should always save at least 3.5 Burning Embers for this dump. While Dark Soul is active, cast Chaos Bolt, or Shadowburn where applicable, as many times as possible. Ensure a freshly applied Immolate is refreshed before entering this dump so you don’t have to re-apply halfway through.
6) Cast Chaos Bolt and Shadowburn when you have major procs active, such as trinkets. You should always cast an ember consumer regardless of your active procs if you are in danger of capping Burning Embers. Try to avoid casting Chaos Bolt if you have more than two Backdraft stacks, though, there are situations that exist where this cannot be avoided. Consider that Chaos Bolt has an extremely slow flight time, so if you’re casting it on adds that melt quickly you will lose both the damage and the ember if your target dies mid-flight.
7) Apply Havoc on cooldown where possible. Havoc charges can be spent in a variety of different combinations:
- Spells affected by Havoc are: Immolate, Incinerate, Conflagrate, Chaos Bolt, Shadowburn, Mortal Coil, and Spell Lock.
- Chaos Bolt consumes all 3 stacks of Havoc. All other spells consume a single stack.
- Havoc is best spent on Chaos Bolt if both targets are above 20% health.
- Shadowburn is the best use of Havoc stacks if you can cast at least one Shadowburn + at least one other spell before the target dies, with the obvious ideal situation being 3 Shadowburns cleaved via Havoc.
- Havoc can be used for single target purposes. On fights with irrelevant adds, you can put Havoc up then copy Incinerate/Conflagrate/Immolate. This will effectively double your ember generation for 3 casts, greatly increasing the rate at which you can cast ember consumers. A good example of this was the desecrated axes on Garrosh, or the second head on Megaera.
- Havoc is typically unaffected by range or line of sight requirements. For instance, you can apply a Havoc to an add on the Blackhand balcony, jump down and chaos bolt the boss, and it will copy to the balcony add.
- In any situation where you can Havoc on cooldown it is usually best to do so. It’s more important to copy as many spells as possible, rather than observing the normal rules with consumers and waiting for procs.
8) Use Fire and Brimstone in situations where you need to deal AoE damage. The same priority system applies to Fire and Brimstone spells as single target. It takes approximately 8-10 targets to sustain Fire and Brimstone, decreasing as you gain critical strike rating.
9) Use Rain of Fire on 8+ targets. Rain of Fire deals 50% increased damage to targets afflicted with Immolate, so ensure that it is applied before you lay down Rain of Fire. If two Rain of Fires overlap, the target(s) in both will only take damage from the most recently applied Rain of Fire.
Priority System
This is a list of abilities that are ordered based on the priority they have in the rotation.
1) Cataclysm on cooldown
2) Havoc where applicable
3) Dark Soul: Instability on cooldown
4) Chaos Bolt and Shadowburn during procs
5) Chaos Bolt and Shadowburn when in danger of capping Burning Embers
6) Immolate
7) Conflagrate
8) Incinerate
Opener
1) Draenic Intellect Potion
2) Pre-cast Incinerate 4 seconds prior to boss engagement
3) Pre-cast Immolate
4) Summon Doomguard
5) Dark Soul: Instability + On-use Trinkets + Racials
6) Conflagrate
7) Conflagrate
8) Havoc Chaos Bolt
9) Cataclysm
10) Incinerate for embers
11) Immolate in pandemic range
12) Conflagrate as charge becomes available
13) Incinerate for embers
14) Chaos Bolt as many times as possible with remaining Dark Soul/Trinkets
Demonic Servitude Rotation
This is the basic rotation and priority system. In the Advanced Play section I’ll cover more complex methods to greatly improve your play. You should be using Grimoire of Service when playing as Demonic Servitude.
1) Keep Immolate applied to the main target at all times. Immolate does moderate damage and criticals generate one emberbit, and you can apply it manually to up to three targets for a single target increase. Immolate only needs to tick a single time for it to be a DPS increase — approximately 2.5s in average haste levels.
2) Cast Conflagrate as often as possible to generate Burning Embers. Conflagrate has two charges, and grants the Backdraft buff. Chaos Bolts consume 3 Backdraft stacks at a time while Incinerates consume only a single stack. Always spend this buff on Incinerate where possible for a large increase in both ember generation and mana sustainability. You should never let Conflagrate sit on 2 charges.
3) Cast Incinerate to generate Burning Embers.
4) Cast Grimoire: Doomguard and Dark Soul: Instability on cooldown. You should always save Grimoire: Doomguard and at least 3.5 Burning Embers for this dump. While Dark Soul is active, cast Chaos Bolt, or Shadowburn where applicable, as many times as possible. Ensure a freshly applied Immolate is refreshed before entering this dump so you don’t have to re-apply halfway through.
5) Cast Chaos Bolt and Shadowburn when you have major procs active, such as trinkets. You should always cast an ember consumer regardless of your active procs if you are in danger of capping Burning Embers. Try to avoid casting Chaos Bolt if you have more than two Backdraft stacks, though, there are situations that exist where this cannot be avoided. Consider that Chaos Bolt has an extremely slow flight time, so if you’re casting it on adds that melt quickly you will lose both the damage and the ember if your target dies mid-flight.
6) Apply Havoc on cooldown where possible. Havoc charges can be spent in a variety of different combinations:
- Spells affected by Havoc are: Immolate, Incinerate, Conflagrate, Chaos Bolt, Shadowburn, Mortal Coil, and Spell Lock.
- Chaos Bolt consumes all 3 stacks of Havoc. All other spells consume a single stack.
- Havoc is best spent on Chaos Bolt if both targets are above 20% health.
- Shadowburn is the best use of Havoc stacks if you can cast at least one Shadowburn + at least one other spell before the target dies, with the obvious ideal situation being 3 Shadowburns cleaved via Havoc.
- Havoc can be used for single target purposes. On fights with irrelevant adds, you can put Havoc up then copy Incinerate/Conflagrate/Immolate. This will effectively double your ember generation for 3 casts, greatly increasing the rate at which you can cast ember consumers. A good example of this was the desecrated axes on Garrosh, or the second head on Megaera.
- Havoc is typically unaffected by range or line of sight requirements. For instance, you can apply a Havoc to an add on the Blackhand balcony, jump down and chaos bolt the boss, and it will copy to the balcony add.
- In any situation where you can Havoc on cooldown it is usually best to do so. It’s more important to copy as many spells as possible, rather than observing the normal rules with consumers and waiting for procs.
7) Use Fire and Brimstone in situations where you need to deal AoE damage. The same priority system applies to Fire and Brimstone spells as single target. It takes approximately 8-10 targets to sustain Fire and Brimstone, decreasing as you gain critical strike rating.
8) Use Rain of Fire on 8+ targets. Rain of Fire deals 50% increased damage to targets afflicted with Immolate, so ensure that it is applied before you lay down Rain of Fire. If two Rain of Fires overlap, the target(s) in both will only take damage from the most recently applied Rain of Fire.
Priority System
This is a list of abilities that are ordered based on the priority they have in the rotation.
1) Havoc where applicable
2) Grimoire: Doomguard and Dark Soul: Instability on cooldown
3) Chaos Bolt and Shadowburn during procs
4) Chaos Bolt and Shadowburn when in danger of capping Burning Embers
5) Immolate
6) Conflagrate
7) Incinerate
Opener
1) Draenic Intellect Potion
2) Pre-cast Incinerate 4 seconds prior to boss engagement
3) Pre-cast Immolate
4) Grimoire: Doomguard
5) Dark Soul: Instability + On-use Trinkets + Racials
6) Conflagrate
7) Conflagrate
8) Incinerate until 2 embers
9) Chaos Bolt
10) Chaos Bolt
11) Immolate in pandemic range
12) Conflagrate as charge becomes available
13) Incinerate for embers
14) Chaos Bolt as many times as possible with remaining Dark Soul/Trinkets
Talents Cheatsheet
Level 15: Soul Leech
Level 30: Shadowfury
Level 45: Soul Link
Level 60: Burning Rush
Level 75: Grimoire of Sacrifice
Level 90: Archimonde’s Darkness
Level 100: Charred Remains
Advanced Talents
Level 15: Dark Regeneration, Soul Leech, Harvest Life
Dark Regeneration
A viable alternative on encounters where Soul Leech has little effect (the magical soaking on Ko’ragh, for example).
Soul Leech
The strongest option for the majority of encounters.
Harvest Life
Do not take under any circumstances.
Level 30: Howl of Terror, Mortal Coil, Shadowfury
Howl of Terror
Breaks on damage limiting its usefulness on raid encounters.
Mortal Coil
Doesn’t provide the healing return to mobs that are immune to the horrify effect.
Shadowfury
Most adds are stunnable making this the go-to talent in general.
Level 45: Soul Link, Sacrificial Pact, Dark Bargain
Soul Link
The best option for most raid encounters. If you are playing with Grimoire of Sacrifice, you are instead granted 20% maximum health which results in the same effective health increase.
Sacrificial Pact
A strong alternative if damage is very spaced out, or you’re assigned to soak a specific mechanic. Best paired with Glyph of Demon Training and a Felguard for a larger absorption shield.
Dark Bargain
Only used in scenarios where an immunity allows you to game a specific mechanic. It’s worth noting that Dark Bargain is considered an absorb, so it can be used even for mechanics that ‘pierce immunities’ (the orbs and magical shield on Ko’ragh, for example).
Level 60: Blood Horror, Burning Rush, Unbound Will
Blood Horror
Doesn’t really have applicable use in PvE.
Burning Rush
Your go-to talent in most situations, due to our lack of a baseline movement speed cooldown.
Unbound Will
Has its uses on encounters with important mechanics that need to be dispelled immediately, though I find this talent is often overrated when you consider the merits of Burning Rush in comparison.
Level 75: Grimoire of Supremacy, Grimoire of Service,Grimoire of Sacrifice
Your choice of Grimoire is tied directly to your choice of level 100 talent. I’ll go over these in more detail later.
Grimoire of Supremacy
Generally inferior to the other two options. Scales linearly with increased number of sustained targets.
Grimoire of Service
The best single target option when paired with Demonic Servitude if you don’t have the gear to support Sacrifice/Charred Remains. Scales poorly with increased number of sustained targets.
Grimoire of Sacrifice
The best option when paired with Charred Remains, T17 4-piece, and Goren Soul Repository. Scales much better than the other two options.
Level 90: Archimonde’s Darkness, Kil’jaeden’s Cunning,Mannoroth’s Fury
Archimonde’s Darkness
You will use this on every encounter.
Kil’jaeden’s Cunning
Pales in comparison to the potency of an extra Dark Soul, given we’re relatively unaffected by movement.
Mannoroth’s Fury
Rain of Fire is too weak currently for this talent to be considered.
Level 100: Charred Remains, Cataclysm, Demonic Servitude
Charred Remains
Best paired with Grimoire of Sacrifice. Greatly simplifies the rotation and provides the strongest overall damage, with a few exceptions. Requires a reasonable amount of gear to support. Punished heavily by movement.
Cataclysm
Best paired with Grimoire of Sacrifice. This is the best option for Challenge Modes and “Council Style” fights (3-4 bosses) where you can reliably hit at least 3.
Demonic Servitude
Best paired with Grimoire of Service. Allows you to replace your Summon Doomguard and Summon Infernal spells with permanent pets. Your Doomguard hits extremely hard, and once every two minutes you will be able to summon a second Doomguard via Grimoire: Doomguard (when playing Service). All Doomguards hit 20% harder when the target is below 20% health. This is the best option for single target if you don’t have the gear to support Charred Remains.
Glyphs
Major
Glyph of Eternal Resolve
Replaces Unending Resolve with passive 10% damage reduction. Weighing 8s of 40% damage reduction every 3 minutes (~4.5% maximum uptime) against 10% damage reduction all the time it’s easy to see why this glyph is well used by all warlock specializations.
Glyph of Dark Soul
Halves the duration and cooldown of Dark Soul. Generally speaking this glyph is rarely used unless you’re speccing Charred Remains. If you’re playing Charred Remains this glyph is usable on low movement fights, as it increases the number of buffed Chaos Bolts you can get off per minute. Regardless of what spec you play this glyph gets weak the shorter the fight gets as it hurts your uptime, so you’ll want to avoid it on fights like Butcher and Tectus. While I recommend testing both glyphed and unglyphed to find your preference, there are typically more advantages to playing unglyphed.
Situational
Glyph of Demonic Circle
Reduces the cooldown of your Demonic Circle from 30s to 26s. Just like the ability Demonic Circle, this glyph is highly underrated and underutilized by the majority of warlocks. There are a lot of mechanics on 30s timers, and the use of this glyph allows Demonic Circle to be available for all of them (e.g. Demolition on Blackhand).
Siphon Life
Causes Corruption ticks to heal you for 0.35% of your maximum health when it ticks. This glyph is highly overrated but if you need to fill a glyph slot it doesn’t hurt.
Glyph of Demon Training
Has no effect for Destruction. Does not make your Imp magically do more DPS!
Glyph of Soulstone
Causes players resurrected by your Soulstone to revive at 100% of their maximum health. This glyph is very strong if you’re pre-soulstoning tanks because it basically eliminates the possibility of them being immediately gibbed.
Glyph of Strengthened Resolve
Increases your Unending Resolve‘s reduction to 60% and increases the cooldown by 60s (4 minutes total). This glyph is useful for allowing you to soak extremely large hits without having to spec Sacrificial Pact. Combined with Soul Link it totals 80% damage reduction while active.
Glyph of Unending Resolve
Reduces your Unending Resolve reduction to 20% and reduces the cooldown by 60s (2 minutes total). This glyph is useful on fights where you need the silence immunity provided (Thok is the only good example).
Glyph of Healthstone
Increases the healing done by your healthstone by 100%, but instead of being instant, the heal is applied over 10s. This glyph is best paired with Dark Regeneration. In general I find this glyph to be somewhat of a trap since the primary benefit of a healing tonic/healthstone is to give a quick instant heal to save you from the next hit. Unless you’ve premeditated where you’ll be using your healthstone I would avoid the use of this glyph.
Stats
Stat Priority (Supremacy/Service): Mastery > Crit > Multistrike > Haste = Versatility
Stat Priority (Sacrifice): Mastery >>> Crit > Multistrike > Versatility > Haste
One thing that is extremely important to understand, no matter what class you play, is the relative values of stats to your character. In most cases, stats you have very little of will inflate in value, while stats you have a surplus of will diminish in value. What this means for you is that the stat priority isn’t ironclad; Multistrike and Haste, for example, have interchangeable value depending on how much or little of each you have.
Intellect
Our primary and most important stat. All our damage scales with intellect.
Mastery: Emberstorm
increases the damage done by all of our damaging spells, albeit at varying degrees of effectiveness. The damage of ember consuming spells is affected most, though our pets remain unaffected. This makes Mastery particularly strong when Grimoire of Sacrifice is chosen.
1% Ember Generator Damage = 110 Mastery Rating
1% Ember Consumer Damage = 36.7 Mastery Rating
Crit
Increases your chance to critically hit with your spells. Conflagrate and Incinerate generate double emberbits when they critically strike, and Immolate generates one emberbit. Chaos Bolt damage scales linearly with critical strike chance; 1% crit is exactly 1% bonus damage on your Chaos Bolt.
1% = 110 Critical Strike Rating
1% = 93.5 Critical Strike when accounting for Devastation
Multistrike
Increases your chance to strike at the target multiple times in the same spell. Each spell has a chance to multistrike twice. Multistrikes cannot multistrike. The damage of a multistrike is always 30% the value of the initial hit. This means the maximum potential bonus damage of a single attack is 160%. To compensate for this being inherently less than a critical strike, multistrike is a ‘cheaper’ stat. Multistrike does not have any guaranteed interaction with our spells the same way Critical Strike does, making this stat inferior to crit in all situations.
1% = 66 Multistrike Rating
Haste
Haste is a mediocre stat for Destruction, since our GCD is baseline 1s via Chaotic Energies. While haste does affect the speed at which you regenerate mana, you also cast faster at an equal and linearly scaling rate, effectively making a haste a mana neutral stat. While haste is not a very effective stat on single target, it does gain value on sustained AoE. It also scales well with our 2-piece set bonus.
1% = 90 Haste Rating
Versatility
Increases your damage, healing, absords, along with reducing the damage you take. Versatility is intentionally tuned to be an expensive stat since it does so many things.
1% Damage/Healing/Absorbs = 130 Versatility Rating
1% Damage Reduction = 260 Versatility Rating
The stat priority is roughly the same across all talents and grimoires, though the significance of each stat varies depending on your choices.
Enchants
Rings: Enchant Ring – Gift of Mastery
Cloak: Enchant Cloak – Gift of Mastery
Neck: Enchant Neck – Gift of Mastery
Weapon: Mark of Bleeding Hollow
Gems: Greater Mastery Taladite
Consumables
Food: Sleeper Sushi
Potion: Draenic Intellect Potion
Flask: Greater Draenic Intellect Flask
Gear
| Slot | Item | Source |
|---|---|---|
| Helmet | Shadow Council’s Hood | Kromog |
| Necklace | Gruul’s Lip Ring | Gruul |
| Shoulder | Shadow Council’s Mantle | Thogar |
| Cloak | Runefrenzy Greatcloak | Kromog |
| Chest | Shadow Council’s Robes | Flamebender |
| Bracer | Bracers of Darkened Skies | Trash |
| Gloves | Shadow Council’s Gloves | Iron Maidens |
| Waist | Seeking Ember Girdle | Beastlord |
| Legs | Turret Mechanic’s Legwraps | Iron Maidens |
| Boots | Cavedweller’s Climbers | Gruul |
| Ring | Uk’urogg’s Corrupted Seal | Iron Maidens |
| Weapon | Blackhand Doomstaff | Blackhand |
| Trinket | Goren Soul Repository | Oregorger |
| Trinket | Blackiron Micro Crucible | Blackhand |
Blackrock Foundry

Oregorger
Talents
Grimoire of Sacrifice, Charred Remains
Strategy
Put a Demonic Circle down outside your assigned lane as an insurance policy against rolls. You can forego Eternal Resolve glyph if you’re afraid you might get rolled over. Place a gateway to help you and your raid with movement between the lanes. Take advantage of Havoc and Immolate on the crates during the intermission phase. If you get a second crate phase while the boss is in execute you should cleave Shadowburns onto the crates via Havoc.

Hans’gar & Franzok
Talents
Grimoire of Sacrifice, Charred Remains
Strategy
Place a Demonic Circle near your starting point to help you reset positioning for the second set of smart stampers, and help you traverse the room during Searing Plates. Use Havoc on cooldown to cleave Chaos Bolts and Shadowburns. Re-apply Immolate before either boss jumps up, as it will continue to tick and generate embers while the boss is on the balcony. If you’re struggling with the heavy movement, Kil’jaeden’s Cunning is a viable alternative on this encounter.

Beastlord Darmac
Talents
Grimoire of Sacrifice, Charred Remains
Strategy
Place a Demonic Circle to help with movement and avoiding the flame breath. Make sure you are using Havoc on cooldown. Use the spears and Pack Beasts as Shadowburn fodder for bonus embers. You should apply Immolate to the spears when you aren’t casting Chaos Bolts for a bit of bonus damage and embers.

Gruul
Talents
Grimoire of Sacrifice, Charred Remains
Strategy
Place a Demonic Circle so you can instantly teleport back to the ground after Petrifying Slam.

Flamebender Ka’graz
Talents
Grimoire of Sacrifice, Charred Remains
Strategy
Place a circle wherever your spot in the room is, in case you get Molten Torrent and have to run to melee. You should be able to sustain Fire and Brimstone if all 4 dogs are stacked in melee range. Make sure you reapply Immolate right before the dogs die as DoTs continue to tick on them after they despawn.

Operator Thogar
Talents
Grimoire of Sacrifice, Charred Remains
Strategy
Place a Demonic Circle in the lane adjacent to the boss on the far right. You can use this to dodge the first deforester and a second deforester later in the fight. Gateways can be used to help your raid deal with deforesters as well. Use Havoc to help kill Gunnery Sergeants quickly and burn down priority targets, such as Man-at-Arms.

Blast Furnace
Talents
Grimoire of Sacrifice, Charred Remains
Strategy
Use Havoc on cooldown. Glyph of Dark Soul is usable on this fight as there are frequent priority targets, though my preference is still unglyphed. You can place gates to help with the sides uniting after Phase 1, or to help your side reach the first bellows immediately.

Kromog
Talents
Grimoire of Sacrifice, Charred Remains
Strategy
Place a Demonic Circle on top of your assigned hand area for quick movement. Place a Demonic Gateway to help with movement between pillars. You should be able to destroy the hand phase with Fire and Brimstone. Ensure you do apply a Fire and Brimstone Immolate as the sheer amount of targets will result in a plethora of 2-piece procs.

Iron Maidens
Talents
Grimoire of Sacrifice, Cataclysm
Strategy
If your guild is really struggling with the sub 20% phase, or you need to be more effective on boats, I would recommend playing Charred Remains instead. Keep full DoTs on all three and cast Cataclysm on cooldown. Save your second Dark Soul charge for the execute phase where you can cleave Shadowburns constantly via Havoc. If you go up on Ga’ran’s boat you can use your Havoc to generate bonus embers on the shielded mob by cleaving Incinerates/Conflagrates.

Blackhand
Talents
Grimoire of Sacrifice, Charred Remains
Glyphs
Glyph of Demonic Circle
Strategy
Place Demonic Circle and Demonic Gateway in Phase One to assist with movement. Save second Dark Soul charge for execute as Phase 3 is extremely important. You can use Havoc cleave and Immolate to provide heavy Siegemaker damage without switching off the boss. Use your Demonic Circle in Phase 3 to immediately port back after Impaling Throw hits you.
Challenge Modes
Stat Priority
Mastery > Crit > Haste > Multistrike > Versatility
Focus on finding pieces with Mastery and Crit. You will never get enough of the other 3 stats for them to matter, so consider them equally ‘bad’. Generally speaking, a randomly rolled double Mastery piece is better than a Mastery/Crit piece.
Gear
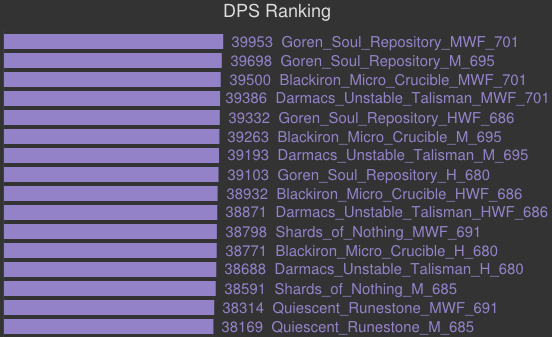
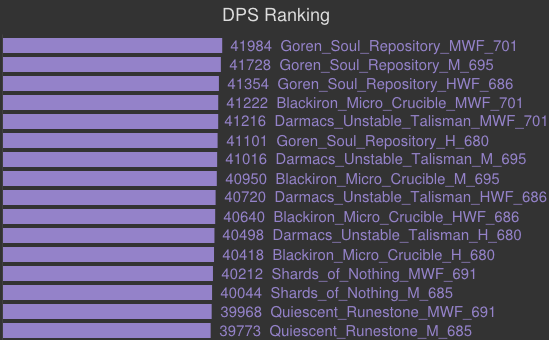
With the amount of readily accessible randomly rolled gear there isn’t a true BiS list for all slots. Trinkets are the most important pieces by far:
Trinket 1: Copeland’s Clarity
Trinket 2: Stone of Fire
Alternative Trinket 2 (Alchemist’s Only): Draenic Philosopher’s Stone
Stone of Fire has 77 more int on proc inside of Challenge Modes versus the Philosopher’s Stone, however, the Philosopher’s Stone is basically free to craft and has a Mastery Passive instead of Versatility. Ultimately the Stone of Fire is slightly better though the difference between them is small. Both trinkets have a 55s ICD and will proc on basically anything you do (buffing, mounting up, etc.).
Other decent/usable trinkets are:
Goren Soul Repository
Munificent Orb of Ice
Quiescent Runestone
Primal Gladiator’s Insignia of Dominance
Here are a few pieces to keep an eye out for:
| Slot | Item | Source |
|---|---|---|
| Helmet | Hood of Arcane Mystery | Various Bosses |
| Necklace | Magister’s Chain | Various Bosses |
| Shoulder | Felflame Spaulders | Various Bosses |
| Cloak | Drape of Frozen Dreams | Various Bosses |
| Chest | Shadow Council’s Robes | Flamebender |
| Bracer | Frost-Touched Wristwraps | Various Bosses |
| Gloves | Primal Gladiator’s Gloves of Prowess | Conquest Vendor |
| Waist | Frost-Touched Cord | Various Bosses |
| Legs | Solarflame Legwraps | Rukhmar |
| Boots | Sandals of Arcane Mystery | Various Bosses |
| Ring | Kargath’s Last Link | Kargath |
| Ring | Seal of Arcane Wrath | Imperator Mar’gok (LFR) |
| Weapon | Spire of the Furious Construct | Araknath (Skyreach) |
These pieces are just guidelines. There are other Mastery/Crit pieces available with inferior weightings, and you can and should replace some of these pieces with better weighted crafted pieces (Hexweave, of the Peerless).
Talents
Level 15: Soul Leech
Level 30: Shadowfury
Level 45: Sacrificial Pact
Level 60: Burning Rush
Level 75: Grimoire of Sacrifice
Level 90: Archimonde’s Darkness
Level 100: Cataclysm
Macros
The only macros that I recommend everyone have are simple pet control macros.
/petattack
/petfollow
/petmoveto
These three macros give you full control over your pet. Your pet is just an extension of your character’s damage and having 100% manual control over it is very important. For example, certain mobs have larger hitboxes causing the Felguard to stand far behind it. If this is the priority target (e.g. Bellows Operator) and it’s in the middle of a pack of mobs when you cast Felstorm, your pet will just Felstorm at the large mob’s maximum hitbox, only hitting one mob. With the /petmoveto macro, you can move your pet right into the middle of the pack for maximum cleave.
Some people like to use mouseover macros for Havoc and Shadowburn, though if you decide to do this I recommend you have a separate bind for the macro. If your mouseover target is friendly or dead, it will instead apply the spell to your current target.
#showtooltip
/cast [@mouseover,harm,nodead][]Shadowburn
#showtooltip
/cast [@mouseover,harm,nodead][]Havoc
AddOns
Weak Auras is, simply put, the best AddOn ever made. At worst, you can use this AddOn to create simple visual cues to track your procs, buffs, and debuffs. At it’s best this AddOn can do anything — replace your Boss Mods with custom timers, create cues that trigger other raid members Weak Auras when they need to do something important, and oh so much more. If you only ever get one AddOn, make it Weak Auras!
If you would like to get Furty’s Weak Auras, click here to get all his Warlock Weak Aura strings along with his Fury Bar.
ElvUI is an AddOn that replaces the default UI with a simple, clean, and customizable alternative. While it’s a little limited compared to some of it’s more specialized brethren, it does the job well enough if you don’t want to set up/maintain multiple AddOns.
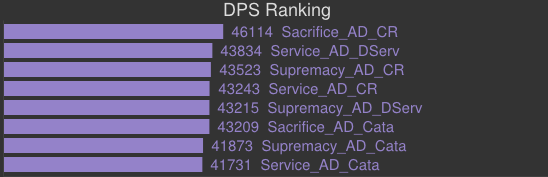
Single Target
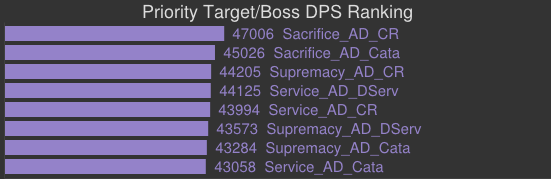
Council Style

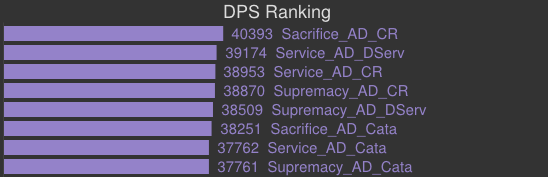
Single Target “Helter Skelter” (Burst Movement)
Single Trinket Sims (Sacrifice/Charred Remains)
Single Trinket Sims (Service/Demonic Servitude)